Friday, March 21, 2014

I Bought Curl formers!!!

So I just bought some curl formers :-)  I have been interested in them, mainly in how they work because they are definitely more weird than any other typical hair curling device.  But I decided to look them up on Amazon and found them for a steal!  40 curl formers for $14!!!  I don't know the pricing well on these things, but from what I could see from my quick internet search and a quick comparison of different eBay and Amazon sellers, this was the best deal ever.  Others were selling 24 pieces for $12 (half the amount for only $2 less), or 10 pieces for $7 (7x4= $28, so more expensive).  I bought 2 packs of 40 from the seller TSSS because a reviewer said that she needed 70 for her head, and to be safe that the seller won't run out or raise the price.


In case you don't know much about curl formers, this is the description from the TSSS Amazon seller's product page (uncorrected);

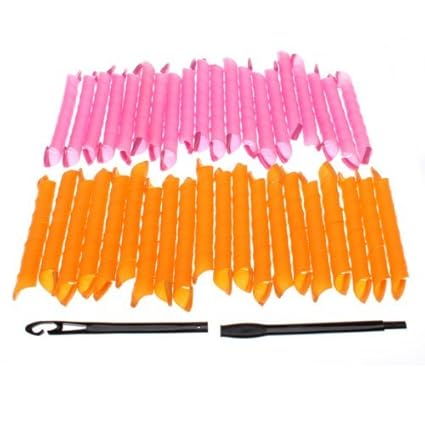
Product Name: TSSS Hair Curler Magic Spiral Ringlets Former Leverage Stretched Length 50CM Circle Roller Pack of 40

Product Description:
Using these rollers/curlers is a simple way to lift up your hair and full of beautiful curls/waves, even if the hair you were born in straight. You will roll your hair quickly and easily to achieve movie star like hair style.
Easy and fast to change your hairstyle for urgent party and occasions
Rapid hair rollers create curly sexy hair style in minutes
Super wide opening curlers for big size curls and thick hair base
DIY at home and save money and time spending at the salon
No chemical damage effect
High temperature resistant and washable
Operation Steps:
Control the hair at 60%-70% of humidity of the zone.
Make stick according to the shape that your want.
Count the stick with cirde that you want
Select the stick flow direction of veins
Select the stick according to the different flowered shape size
Select the liquid medicine adn the time according to the hair
Colding perm time: Healthy hair 15-25mins, Damaged hair 8-15mins.
Hotting perm time: Healthy hair 8-15mins, Damaged hair 5-10mins.
Wash and clean the hair.
Dry the hair with towel after then fix the shape 8-15 mins.
Remove the stick, washing hair and styling hair.
Color: Pink+Yellow
I have only seen 1 video of the process, by my hair idol, Youtuber Naptural85.  I watched it long ago so I don't remember what she did, but by the looks of it it seems like you stretch the curl tubes, and use the included hook to put your hair through.  Then you just let the tube close and curl, molding your hair in the spirally shape of the tube.  The hook part seems a bit complicated, but I'm hoping that being a crocheter will work to my advantage in this aspect.  We shall see.

Anyways, I will be sure to post my attempt in the future.  Until then, here is the video I watched.


So I just rewatched this video and the brand name curl formers were $70 for a pack of 40!  So this is much MUCH cheaper.  Hopefully they will work just as well,  I will keep you posted.

Friday, February 21, 2014

Hairstyle: Puff, High Ponytail

It has been a little over a year since I last relaxed my hair (6 months wearing it natural).  I figured it was time for the moment of truth.  I should try to put my hair into a puff, see how close I am to reaching my goal length.  Puff length has been my goal length because I hate wearing my hair out and a puff is good enough for me in terms as pulling my hair back.  Guess what?  I can do it!  My hair fits into a puff!

Actually my hair goes into a puff much better than I expected.  As long as my hair doesn't resist being stretched I don't even need to worry about clipping up stray pieces!  I probably could have started wearing a puff 2 month ago (but using clips).

To get my hair into a puff I tie my hair up into an almost puff, kind of pineapple the night before.  I use a wrap (made from the leg of tights that I cut) tie it loosely around my head starting at the very very edge.  I then gradually tighten the knot as I pull the wrap into a high ponytail (pineapple).  This stretches and prepares the hair it to sit in puff position.  It also helps keep the un-puffed part smooth.  Then I put an additional satin scarf around my edges to keep them smooth as well.  I leave the puff part out to keep it from getting too smashed.


Then to make the puff I can simply take off the night scarves and wrap a more decorative one around the puff, and tighten as much as I want to (without going so tight that pieces start falling out of the puff).  If you're hair isn't as smooth as you'd want (like on days 2+), I add water (or some liquid hair product) and pudding or gel, brush the hair towards the puff, and then put the wrap around it.  I mostly used thin scarves to wrap but ribbon and even shoe laces also work well.  The key is to use something long enough to wrap around and least twice so that everything is contained, and you can pull as tight as you choose to (careful not to give yourself a headache) and then tie it.  I often tied it into a bow, but sometime just a knot.  You can also choose to tuck in the leftover pieces from the tie.  And don't forget to fluff your puff.  Obviously the style is called a puff, so you want it puffy!  I usually simply fluffed it with my hands.

*I prefer to put in whatever hair products that I'm using (pudding or gel work best to keep the puff in place) in my hair the night before, that way it will dry in place by the time I get up and make the scarf switch even easier.

But that's it!  I'm now "ruff and stuff with my afro puff, hey!"


 I was using the products in this post, Review: Lustrasilk Curl Max Products when I wore the silver scarf below.


The eyeshadow look in the picture below is from the palette I swatched here,
Urban Decay Naked 2 - Like Eyeshadow Palette Only $10, Swatches and Review
and did a tutorial on how to get the look here, Nude Plum Eyeshadow Tutorial.


Sunday, February 9, 2014

Review: Lustrasilk Curl Max Products

I've been using Lustrasilk Curl Max hair products on my natural hair for a few weeks so I will give you a review.  I have 3 products from the line; twisty curly spray, curl activator moisturizer, and curl pudding.


This is what they look like:

      
The spray isn't a liquid, it's more like a gel (can you see the clear circle of product in my hand?).


The moisturizer is a slightly thicker orange gel.


The gel turns into a lotion when you rub your hands together, which means a little can go a long way.  I didn't read the instructions at first and put like 6 rounds of the orange gel in my hair, as I spread it around it started turning my whole head white and took a while to rub in.  No harm to my hair, but time and product wasted.


The pudding is pretty much like actual pudding, it's a mix between gel and lotion.  A creamy gel.

My Review:

I used all 3 products together on my damp, just cowashed hair.  After a few minutes, before my hair was even dry, I really did notice that the products brought out curls.  I had a super curly afro!


There is no strong hold though, so once you sleep on the curls they'll never be the same.  My hair didn't feel dry and it was soft and fluffy.  Being that I tend to wear "fluff and go" types of hair styles, I found this product to be great for that purpose since my hair was soft instead of stiff (as with gel).  That being said, ecostyler gel still gives me better, tighter curls, but they are hard and stiff.

 
Pictures above are the day after using the product (I washed my hair the night before, used the product, air dried and slept on my curls, then styled the next day).  I don't think it's as curly as before since I slept on the curls, but I still looks more like puff of mini curls as opposed to just an afro puff.

The second day looked pretty similar as well...


Some days, if I had a few extra minutes, I used the spray, or both the spray and moisturizer in order to help with my hair fluffing.  Using the products really made my puff even bigger so, dare I say it, the two seem to help stretch the curls pretty well after sleeping on it (which compacts and shrinks afro hair dramatically).

The pudding seems to be the most necessary aspect of really defining curls.  I tried once using a generous amount of all 3 products (on freshly washed damp hair).  Generous, as in more than I probably should have used (my hair was dripping product), but got this nice well defined curly 'fro (from the pictures above).

And I tried again using small amounts of the products (my hair was just damp with product), and didn't notice very defined curls.  

Warnings: 

- Be careful with the amount of pudding you use, it looks milky white in the container and it will look milky white in your hair if you leave globs on.

Notice the white globs, my hair is damp now but when it dried you could still see the globs.  Wipe the excess off!

- Don't add ecostyler gel unless you want your 'fro to look like a dandruff filled, dirty bird's nest hot mess!  Seriously, don't do it! 

I tried to "freshen up" my puff by adding water and gel (because I had no time to wash my hair).  I think it looked good the first day, the gel brought out new curls and all.  The next day when fluffing my puff I noticed gel residue coming out so I made a mental note to wash my hair when I got home (because I hate residue).  When I got home and looked in the mirror I noticed white residue everywhere!  All up in my puff, all in the rest of the slicked back portion of my hair, everywhere!  My hair was basically gray because of the white residue mixed with my black hair.  It was sick!  And because I rarely look in the mirror I didn't even notice it all day!  Hopefully no one else did either because no one said anything to let me know that my hair needed help.  Uck!  I digress, the moral of this story is

LUSTRASILK PUDDING + ECOSTYLER GEL = GROSS RESIDUEY HAIR

Conclusion:

I like this line of products. 

Lustrastilk Curl Max spray, moisturizer, and pudding didn't dry out or harden my hair, but kept it soft.  It did define my curls but didn't really hold them after they've been smooshed.  The spray and moisturizer are useful for helping to stretch and puff my hair out.  As long as you don't try to mix the product with gel and don't leave big clumps of product in your hair, there will be no residue. 

4/5 Stars   Lustrasilk Curl Max twisty curly spray
4/5 Stars    Lustrasilk Curl Max curl activator moisturizer
3.5/5 Stars   Lustrasilk Curl Max curl pudding


Friday, January 24, 2014

Hair News, Ariana Grande Wears Extensions!

Ariana Grande Explains Hair Extensions: Natural Hair Looks "Absolutely Ratchet", is the title of a US Magazine article.  I love Ariana even more now 1. for being so honest 2. for saying the word ratchet.  Ratchet just makes things funnier.

Ariana Grande at the Y100?s Jingle Ball 2013  on Dec. 20, 2013
In the article, she basically says that due to all of the chemical coloring and hot tools that have been used, her natural hair a hot mess.  Therefore, she had to try other options in order to make her hair look good.  Wigs didn't look good on her (in her own opinion), but she likes the look of extensions, so she is sticking with it.  

In her role on Victorious as Cat (she was my favorite) she bleached her hair in order to dye it red, which basically killed her hair (although the color was FAB)!
I think most of us know by now that all races (not just black people) wear weave/extensions/clip ins/ hair pieces or whatever else you want to call them, so this admission is not a big shock.  It's a little bit interesting that she openly admits to the extensions though, because not everyone does that.  But it's seriously ridiculous that Ariana Grande is actually being hated on for wearing weave!  REALLY?  Who cares?  What's it to you (haters)?  Grow up!  

Ariana Grande's hair is seriously a big deal right now. There are articles on the E! News page, in the Huffington Post, the Fashion Times, Just Jared, and many other websites.

There is even an article titled Ariana Grande Fires Back at Hair Haters, Explains New Weave: "Gimme a Break", on the Cambio website, so she obviously has gotten many hair complaints... STOP IT!  

Ariana Grande is awesome, let's not try to pick on her for such stupid reason as her hair choices.  What exactly is the problem with how she wears her hair?  Is it harming someone? Please calm down, haters.  It's just hair, she can do what she wants.


Friday, January 10, 2014

Quick Style, 2 Week Hair Part 2: Flat Twist Out


Remember the hair style that enables big hair to fit under a hat?  Quick Style, 2 Week Hair Part 1: Hat Hair, Bump and Twists.  Well after a week the twists start looking a little rugged.  Instead of simply taking out the twists and doing a whole new style, use the twists for a twist out!

The night before, make the front section (that was previously used for a bump) into two flat twists (recall the directions for the left section of hair in part 1).  The next day, take all the twists out and you have a flat twist out that looks nice and twisty!

It really does stay twisted enough to look cute all week without the need to rewash/style!

Day 1


Curls are pretty well defined, especially at the roots.  As you can see, more fluffing and separating is needed on the side so the parts from the flat twists aren't so visible.

Day 2 hair


I brushed my hair back so it looks slicker in the front and still curly in the back.  Made sure I got rid of the parts this time.

As the days go by, and the look gets less and less defined, I pull my hair into a further back puff.  Even with less defined curls, the hair is still clumped together in a dread type curl pattern and stretched more than naturally, so I think it's cute.

Day 5 hair


See, the twist out really lasted a week!

I did my twa version of a pineapple every night.  Use a satin band around your edges to slick them back (or fold a square satin scarf into a band and tie it around) leaving your ends free while you sleep (on a satin pillowcase of course).  That way the curls don't get too smooshed and last longer.

Friday, December 27, 2013

Quick Style, 2 Week Hair Part 1: Hat Hair, Bump and Twists


I finally did my hair!  I've been wearing various headbands for most of the 5 months that I've been natural and avoiding doing my actual hair.  Since I noticed that I've been getting closer and closer to being able to wear a puff without adding 3 headbands and 10 tons of gel (to keep all short pieces held back), I've been wearing a bump in the front and having the rest pulled back via headband (see my Go To Quick and Easy Hair Style: Pouf Puff).

It's hat season!  And I have made myself a ton of hats (it relieves my stress) so I needed a style that would enable my hair to fit in a hat.  So I basically made cornrows of flat twists and left a front section out so that I can wear my bump.

This is an awesome protective style that will protect your hair from the cold weather, and will give you  2 weeks of cute hair.

Products Used:
  • Water
  • Smooth N Shine Therapy Silk Fusion Repair Oil
  • Smooth N Shine Polisher Keratin Power Duo Hold Taming Cream
  • Comb
  • Clips and Clamps
  • Elastic hair Bands (without metal preferred)

How To:
  • On damp (freshly washed) hair I parted my hair in 4 sections; front, back, left, right
    • The front should be the amount that you want to wear in a front bump
  • Ponytail (or clip) up the back, left, and right sections to keep them out of the way

  • Front Section; spray water (if it is dry), add repair oil and taming cream, comb through
    • Optional;  Use elastic hair bands to wrap front section in a ponytail that wraps along the full length of hair (from as close to the root as possible, to the ends of hair)
    • Use more than one band if necessary (I used 2)
    • This will stretch your hair, so that it will go into a bump easier (if your hair is short)
  • Left Section; take off elastic band (or clip) spray water (if it is dry), add repair oil and taming cream, comb through
    • Part the section in half, so that you can make two flat twists with the section
    • Hold the half you aren't working with out of the way with clips

    • Make your first flat twist back, be sure to twist the end of the flat twist (to avoid frizz)
    • Take clips off of second half of the section
    • Make a second flat twist
  • Repeat the steps of the left side, for the back and right sides (2 flat twists in each area)
  • You should have a total of 6 flat twists and a banded front section


Why is Duck Dynasty on my TV?
  • Next Day;  take bands off front section of hair (hair is stretched in place)
  • Make a bump (I made two bumps), bobby pin in place
  • Add a hat behind the bump, bobby pin in place
  • Done!


Part neatness and perfect twisting don't really matter because most of the twists are covered.  Use a moisturizing spray and satin scarf nightly (it helps slick back the hair).  Twists can last a week, bump needs redone every couple of days (unless you use a super hold gel).  Easy!

Part 2, Week 2 coming soon.